「テキストリンクだけじゃなく、カード型でリンクを表示したい!」
「テーマ標準のブログカードはおしゃれじゃない…」
こんな悩みを解決できます!
この記事では、コピペで使える6種類のブログカードを紹介していきます。
オシャレな装飾を無料でゲットできるチャンスなので、ぜひチェックしてみてください。
目次
ブログカードの設置手順
最初にブログカードを設置する方法をご紹介していきます。
手順は次の3ステップ!
- 「functions.php」にPHPコードを追加する
- 「追加CSS」ににデザインコードを追加する
- 記事にブログカードを設置する
図解付きの手順を見たい人は、以下のボタンをタップしてください。
もっと詳しい手順を見る
まずは「functions.php」にブログカード用のPHPコードを追加していきます。
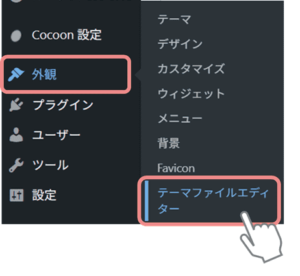
WordPress管理画面から「外観」→「テーマファイルエディター」を クリック。
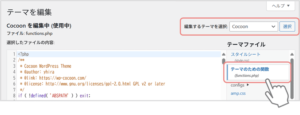
ご利用のテーマを選び、「テーマのための関数(functions.php)」をクリックします。
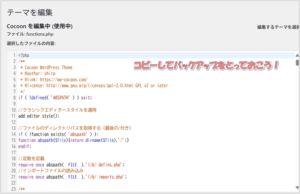
functions.php はテーマのプログラムが書かれている大切なファイルです。
編集前には必ずバックアップを取っておきましょう。
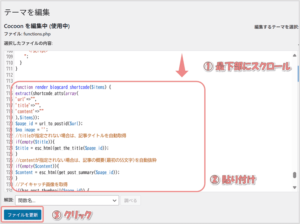
functions.php ファイルの一番下までスクールし、以下のPHPコードをコピペします。
※ 上記コードの $output = ~ の部分は、利用しているテーマやプラグインによって異なります。
以下を参考に書き換えてください。
$output = get_post_custom()['_aioseo_description'][0];
- - - - - - - - - - - - - - - - - - - - - - - - - - - - -
YoastSEOを使っている場合
$output = get_post_meta($post_id,'_yoast_wpseo_metadesc',true);
- - - - - - - - - - - - - - - - - - - - - - - - - - - - -
SANGOを使っている場合
$output = get_post_meta( $post_id, 'sng_meta_description', true );
- - - - - - - - - - - - - - - - - - - - - - - - - - - - -
いずれも使っていない場合
$output = get_the_excerpt();
入力が終わったら「ファイルを更新」をクリックして保存しましょう。
これで STEP1は完了です!
STEP2では、ブログカードの「色」や「フォントサイズ」などデザインを整えるコードを追加します。
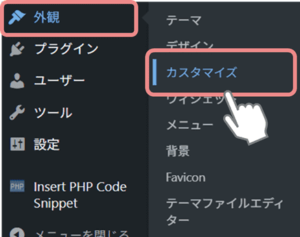
「外観」→「カスタマイズ」を選択してください。
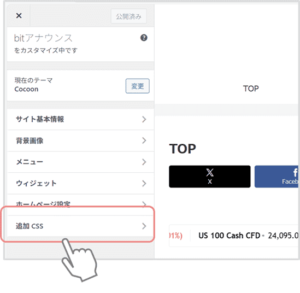
メニューから「追加CSS」を選択します。
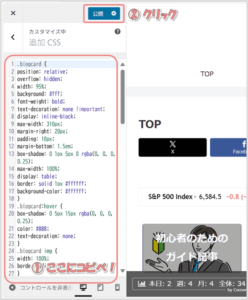
「追加CSS」の入力エリアに、以下のCSSコードをコピペしてください。
コードを追加したら「公開」ボタンをクリックして保存します。
以上で STEP2は完了です。
では、いよいよ記事にブログカードを設置していきましょう。
最後に、記事本文へショートコードを追加し、ブログカードを設置していきます。
ブログカードを設置したい投稿記事(または固定記事)を開いてください。
編集画面左上の ![]() ボタンをクリックします。
ボタンをクリックします。
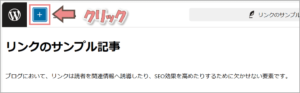
ブロック一覧が表示されたら、「カスタムHTML」を選びます。
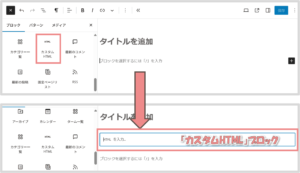
以下のショートコードを「カスタムHTML」ブロックにコピペしましょう。
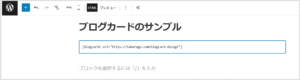
[blogcard1 url="https://〇〇〇〇.com(リンク先の記事URL)" content="記事の概要(任意)"]
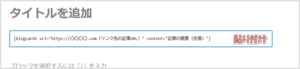
貼り付けたら、URLや記事の概要(※)を入力します。
※「content="~"」 を削除すると、リンク記事の冒頭文が自動で(概要欄に)表示されます。
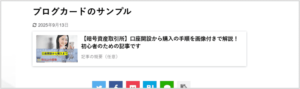
ここまでの手順でブログカードが設置されました。プレビューで確認してみてください。
以上で、ブログカードの基本的な設置方法は終了です。
次の章では、バリエーション豊富な「ブログカードのデザイン例」を紹介しているので、お好みのデザインを探してみてください。(*‘∀‘)
ブログカードのデザイン集
ここからはブログカードのサンプルデザインを紹介していきます。
コピペですぐに取り入れられるので、興味のある人はぜひ使ってみてくださいね!
じゃあさっそく見ていきましょう。
ラベル型ブログカード
背景色: 枠線: タイトル: 概要: .
✙ タップしてコードを見る
※ 上記コードのなかの「$output = ~」については、ご利用の環境によって記載内容が異なります。詳しくはこちらをご覧ください。
[blogcard1 url="https://〇〇〇〇.com(リンク先の記事URL)" content="記事の概要(任意)"]
ラベル型ブログカード2
背景色: 枠線: タイトル: 続きを読む: .
✙ タップしてコードを見る
※ 上記コードのなかの「$output = ~」については、ご利用の環境によって記載内容が異なります。詳しくはこちらをご覧ください。
[blogcard1 url="https://〇〇〇〇.com(リンク先の記事URL)"]
ラベル型ブログカード(分割レイアウト)
背景色: 枠線: タイトル: 続きを読む: .
✙ タップしてコードを見る
※ 上記コードのなかの「$output = ~」については、ご利用の環境によって記載内容が異なります。詳しくはこちらをご覧ください。
<div class="splitlayout">
<div class="leftarea">
[blogcard1 url="https://〇〇〇〇.com(リンク先の記事URL)"]
</div>
<div class="rightarea">
[blogcard1 url="https://〇〇〇〇.com(リンク先の記事URL)"]
</div>
</div>
ボックス型ブログカード

背景色: 枠線: タイトル: 続きを読む: .
✙ タップしてコードを見る
※ 上記コードのなかの「$output = ~」については、ご利用の環境によって記載内容が異なります。詳しくはこちらをご覧ください。
<div class="splitlayout">
<div class="leftarea">
[blogcard1 url="https://〇〇〇〇.com(リンク先の記事URL)" content="記事の概要(任意)"]
</div>
<div class="rightarea">
[blogcard1 url="https://〇〇〇〇.com(リンク先の記事URL)" content="記事の概要(任意)"]
</div>
</div>
ボックス型ブログカード2
背景色: 枠線: タイトル: .
✙ タップしてコードを見る
※ 上記コードのなかの「$output = ~」については、ご利用の環境によって記載内容が異なります。詳しくはこちらをご覧ください。
<div class="splitlayout">
<div class="leftarea">
[blogcard1 url="https://〇〇〇〇.com(リンク先の記事URL)" content="記事の概要(任意)"]
</div>
<div class="rightarea">
[blogcard1 url="https://〇〇〇〇.com(リンク先の記事URL)" content="記事の概要(任意)"]
</div>
</div>
吹き出し付ブログカード
カード背景: カード枠: タイトル: 吹出背景: 吹出枠: コメント: .
✙ タップしてコードを見る
※ 上記コードのなかの「$output = ~」については、ご利用の環境によって記載内容が異なります。詳しくはこちらをご覧ください。
[blogcard1 url="https://〇〇〇〇.com(リンク先の記事URL)" content="ここに概要を記載してください(任意)"]
ショートコードを「ワンクリック」で呼び出す方法
ブログカードを別の記事でも使いたいとき、毎回ショートコードを入力するのってちょっと面倒ですよね…。
そんなときに便利なのが、WordPressの「非同期パターン」機能です。
一度登録してしまえば、次からはワンクリックで呼び出せるようになります。
手順は以下3ステップ。
- ブログカードのショートコードを設置する
- 非同期パターンに登録する
- 登録した ショートコートをワンクリックで呼び出す
図解付きの手順を見たい人は、以下のボタンをタップしてください。
もっと詳しい手順を見る
まずは、非同期パターンに登録したいショートコードを用意しましょう。
詳細については本記事の第1章「ブログカードの設置手順」をご参照ください。
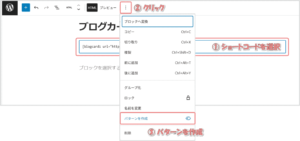
ショートコードを入力したブロックを選択し、右上の 「︙」→「パターンを作成」 をクリック。
続いて表示される「新規パターン作成」画面に、以下を入力て「追加」ボタンをクリックします。
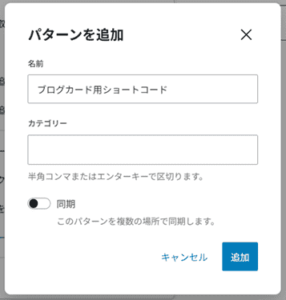
- 名称:わかりやすい名前を入力
- カテゴリー:空白のままでOK
- 同期:OFF
これでブログカード用ショートコードが非同期パターンに登録されました!
最後に、登録したショートコードを呼び出して使ってみましょう。
投稿ページ左上の ![]() ボタンをクリックします。
ボタンをクリックします。
「パターン」タブを開き、マイパターンから「STEP2で登録したパターン」を選択しましょう。
これでブログカードのショートコードを設置できます。

お疲れさまでした!
これで非同期パターンを使った「ショートコードの登録 ~ 呼び出し」までの流れは完了です。
一度登録しておけば、次回からはワンクリックで呼び出せるので、記事作成の効率がグッと上がりますよ!
この記事の内容は以上となります。
~ 最後に ~
この記事ではコピペでかんたんに取り入れられる「ブログカード」をご紹介してきました。
当サイトでは、ブログカードのほかにも「見出し」「ボックス」「ボタン」など、いろんな装飾パーツのデザインサンプルを公開しています。
すべて無料で見れるので、気になった方はぜひチェックしてみてください。
「ブログをオシャレにしたい」「テーマのデザインはしっくりこない」
こんな悩みを解決できるよう、役立つ情報をたくさん発信していきます!
~ こちらの記事もおすすめ ~

\この記事をシェアする!/